[C++] Nested Loops and Variations
Diving Deep with C++ Nested Loops: Your Beginner-Friendly Guide!
So, you're ready to level up your C++ game and explore the fascinating world of nested loops? Awesome! You've come to the right place. Think of loops as magical repeaters, and nested loops?
Well, they're like repeaters within repeaters! Don't worry if that sounds a bit intimidating – we'll break everything down into super-easy-to-understand pieces. We'll assume you're brand new to this, and by the end of this article, you'll be crafting your own nested loop masterpieces!
First, let's quickly recap the basics of loops. We use loops when we want to execute a block of code multiple times. C++ offers three main types of loops: for, while, and do-while. If you're not completely comfortable with these, I highly recommend brushing up on them before diving into nested loops.
Got it? Great! Let's move on!
What in the World are Nested Loops?
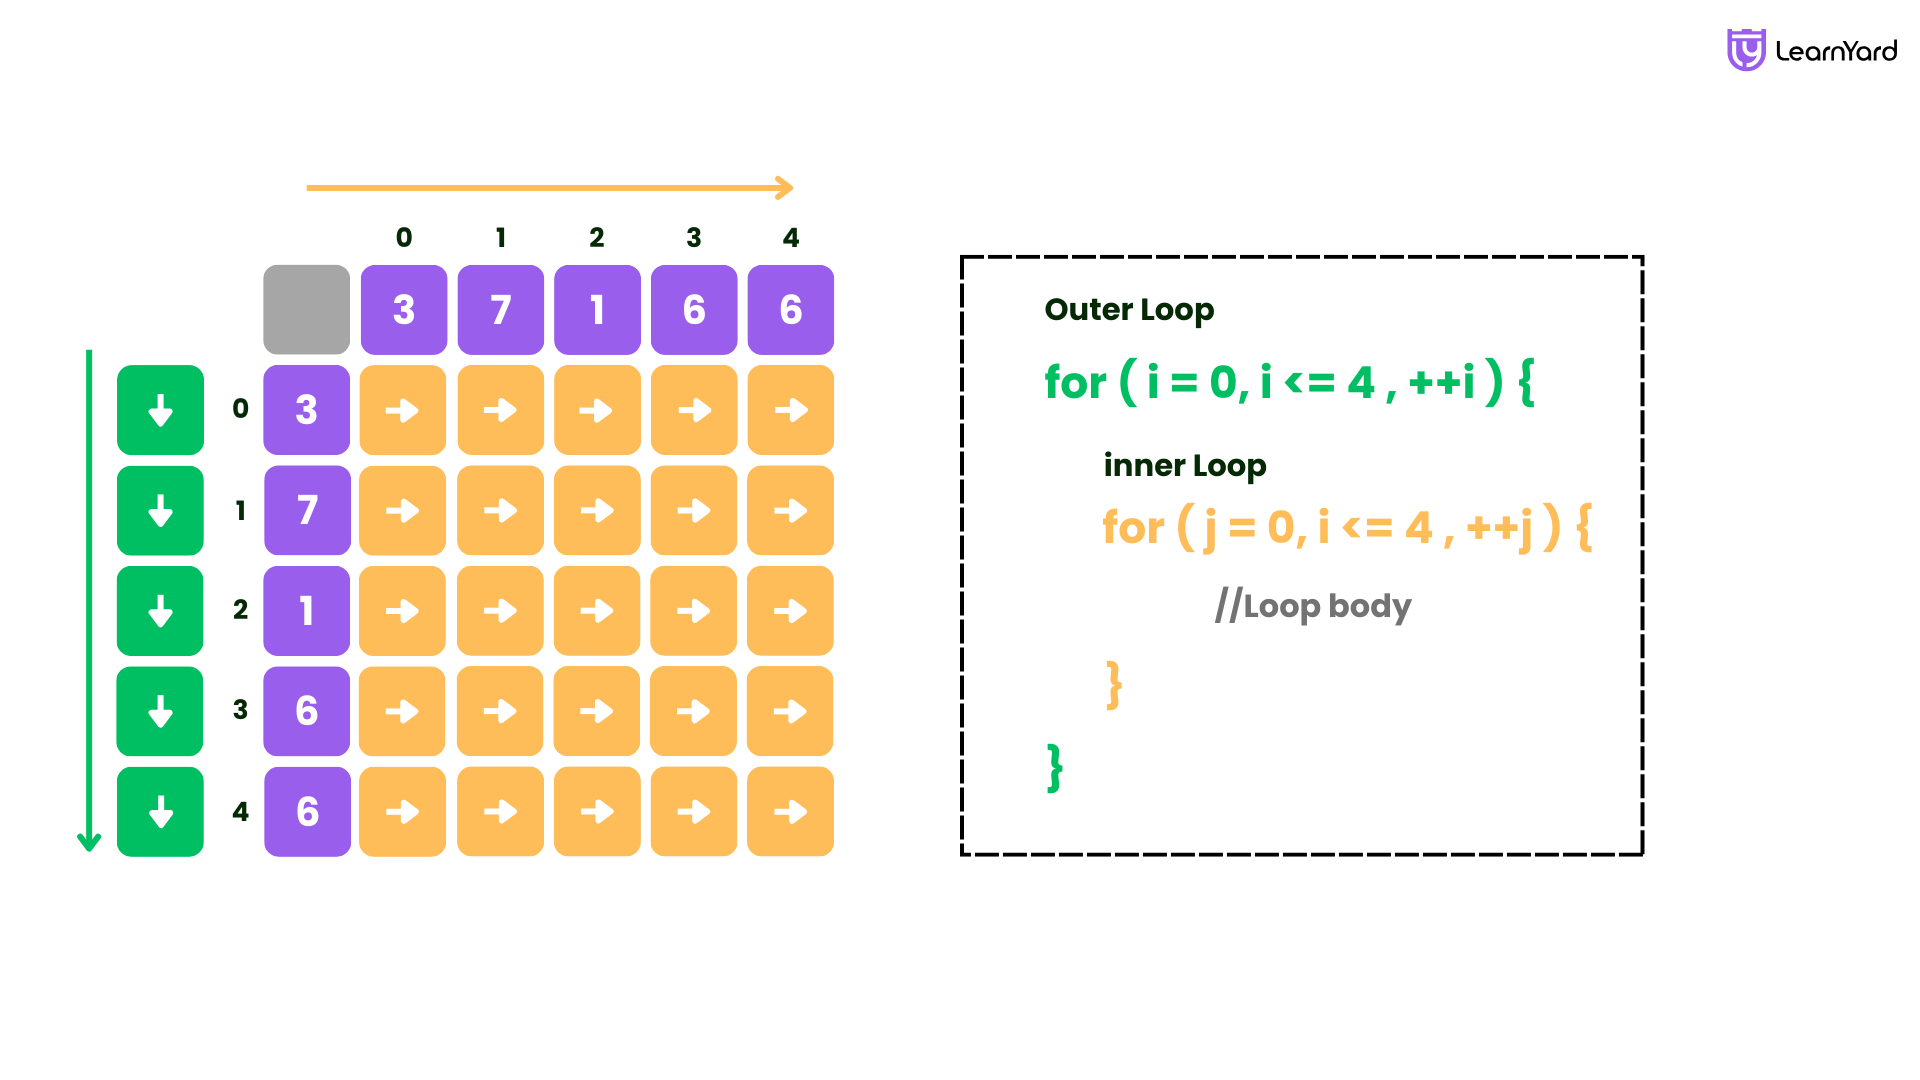
Imagine you're drawing a grid. You need to go row by row, and within each row, you need to draw a column. That's exactly how a nested loop works!
A nested loop is simply a loop placed inside another loop. The inner loop executes completely for each iteration of the outer loop.
The basic syntax for nested loops involves placing one loop inside another, creating a hierarchical structure. There are two main types of nested loops: inner loop and outer loop.
// Outer Loop
for (outer_initialization; outer_condition; outer_update) {
    // Inner Loop
    for (inner_initialization; inner_condition; inner_update) {
        // Loop body
    }
}
Think of it like this: the outer loop controls the "rows," and the inner loop controls the "columns." Each time the outer loop moves to the next "row," the inner loop runs through all the "columns" within that row.
Let's see this in action with our first type of nested loop: the nested for loop!
Mastering the Nested "for" Loop
The for loop is your workhorse for repetitive tasks. It's fantastic when you know exactly how many times you want to repeat a block of code. Now, imagine putting a for loop inside another for loop!
Here's a simple example that prints out a rectangle of asterisks (*):
#include <iostream>

using namespace std;

int main() {
  int rows = 5;
  int columns = 10;

  // Outer loop: Iterates through the rows
  for (int i = 0; i < rows; i++) {
    // Inner loop: Iterates through the columns
    for (int j = 0; j < columns; j++) {
      cout << "*"; // Print an asterisk for each column
    }
    cout << endl; // Move to the next line after each row is complete
  }

  return 0;
}
Let's break this down, step-by-step:
- #include <iostream>: This line includes the iostream library, which allows us to use cout for printing to the console.
- using namespace std: This line allows us to use elements from the std (standard) namespace without having to type std:: before each element (like cout).
- int rows = 5; and int columns = 10: We declare two integer variables, rows and columns, to store the number of rows and columns our rectangle will have. We set them to 5 and 10, respectively.
- Outer for loop (for (int i = 0; i < rows; i++)):
- int i = 0: This initialises a counter variable i to 0. This variable will track our current row.
- i < rows: This is the loop's condition. The loop will continue as long as i is less than rows (which is 5).
- i++: This increments i by 1 after each iteration of the outer loop. So, i will go from 0 to 4 (a total of 5 times).
- Inner for loop (for (int j = 0; j < columns; j++)): This loop sits inside the outer loop.
- int j = 0: This initialises a counter variable j to 0. This variable will track our current column.
- j < columns: This is the loop's condition. The loop will continue as long as j is less than columns (which is 10).
- j++: This increments j by 1 after each iteration of the inner loop. So, j will go from 0 to 9 (a total of 10 times).
- cout << "*": This line inside the inner loop prints an asterisk (*) to the console. Crucially, this is executed 10 times for each row!
- cout << endl: This line inside the outer loop (but outside the inner loop) prints a newline character (endl) to the console. This moves the cursor to the beginning of the next line, effectively creating a new row.
The magic happens like this:
- The outer loop starts (i = 0).
- The inner loop runs completely (from j = 0 to j = 9), printing 10 asterisks.
- cout << endl; creates a new line.
- The outer loop increments (i = 1).
- The inner loop runs completely again, printing another 10 asterisks.
- This repeats until the outer loop finishes (when i = 5).
The result? You get a beautiful rectangle of asterisks!
Output:
**********
**********
**********
**********
**********
In normal 1D loops, we need only one number to index an array, starting from 0 to n-1. But for a grid or a 2D matrix, we need two numbers to identify a block, the first number for the row and the second number for the column.
Each position in the grid is uniquely determined by a (row, column) pair.
To access every block or cell in such a grid, we use two nested loops: the outer loop iterates over the rows, and the inner loop iterates over the columns. This way, for every row, we visit each column one by one.
Let’s see how we can use this idea to print all the indexes of a 3×3 matrix in C++:
#include <iostream>
using namespace std;
int main()
{
    // Outer Loop
    for (int i = 1; i <= 3; i++) {
        // Inner Loop
        for (int j = 1; j <= 3; j++) {
            cout << "(" << i << ", " << j << ") ";
        }
        cout << endl;
    }
    return 0;
}
Output:
(1, 1) (1, 2) (1, 3)
(2, 1) (2, 2) (2, 3)
(3, 1) (3, 2) (3, 3)
Venturing into the Nested while Loop
Just like the for loop, you can nest a while loop inside another while loop. The logic remains the same – the inner loop runs completely for each iteration of the outer loop.
Here's an example that does the same thing as the previous one (prints a rectangle of asterisks), but using nested while loops:
#include <iostream>

using namespace std;

int main() {
  int rows = 5;
  int columns = 10;

  int i = 0; // Initialize row counter
  while (i < rows) {
    int j = 0; // Initialize column counter
    while (j < columns) {
      cout << "*";
      j++;
    }
    cout << endl;
    i++;
  }

  return 0;
}
Key differences from the for-loop version:
- We need to explicitly initialise the counter variables (i and j) before the loops start.
- We also need to explicitly increment the counter variables (i++ and j++) inside the loops.
However, the fundamental principle of nesting remains the same. The outer while loop controls the rows, and the inner while loop controls the columns.
Discovering the Nested do-while Loop
The do-while loop is a slightly different beast. The key difference is that it always executes the loop body at least once, regardless of whether the condition is initially true or false.
Let's rewrite our asterisk rectangle example using nested do-while loops:
#include <iostream>

using namespace std;

int main() {
  int rows = 5;
  int columns = 10;

  int i = 0; // Initialize row counter
  do {
    int j = 0; // Initialize column counter
    do {
      cout << "*";
      j++;
    } while (j < columns);
    cout << endl;
    i++;
  } while (i < rows);

  return 0;
}
The logic is virtually identical to the nested while loop, but the do-while loop guarantees at least one iteration, even if i or j started with values that would immediately make the conditions i < rows or j < columns false.
In this specific example, it won't make a difference, but it's important to understand the subtle distinction.
The Importance of Time Complexity for Nested Loops
Now, let's talk about something super important when dealing with loops, especially nested ones: time complexity.
Time complexity is a way of describing how the running time of your code grows as the input size increases.
For single loops, the time complexity is often expressed as O(n), where 'n' represents the number of times the loop iterates. This means the running time grows linearly with the input size.
But what happens with nested loops? Let's say you have two nested loops, like this:
for (int i = 0; i < n; i++) {
  for (int j = 0; j < m; j++) {
    // Some code
  }
}
The outer loop runs 'n' times, and for each of those 'n' times, the inner loop runs 'm' times. Therefore, the code inside the inner loop executes a total of n * m times.
This means the time complexity is O(n * m). If n and m are roughly the same size, we often simplify this to O(n2), pronounced "O of n squared."
Why is this important?
As your input size ('n' and 'm' in our example) gets larger, the running time of your nested loop code will increase much faster than the running time of a single loop.
A program with O(n2) time complexity will become significantly slower than a program with O(n) time complexity as 'n' grows.
If you have three nested loops, the time complexity would be O(n * m * k), or O(n3) if all three loops iterate roughly the same number of times.
In general, as we keep nesting loops, assume each loop runs 'n' times the time complexity keeps multiplying by 'n' for each level of nesting. In simple words, the more loops we nest inside each other, the more 'n' terms get multiplied together, leading to complexities like O(n⁴), O(n⁵), and so on, depending on how many times we have nested the loops. This shows that deeper nesting results in much higher time complexities, which can make the program slower as the input size grows.
The takeaway: Be mindful of nested loops, especially deeply nested ones. They can significantly impact the performance of your code, especially when dealing with large datasets. Consider if there are alternative, more efficient algorithms you can use. Sometimes, a clever approach with data structures can drastically reduce the need for nested loops.
Beyond the Basics: Variations and Use Cases
Now that you've grasped the fundamental concepts, let's explore some variations and real-world applications of nested loops:
- Varying Loop Conditions: The conditions in your inner and outer loops don't have to be simple i < n. You can use more complex conditions based on other variables or even calculations. This allows for intricate patterns and logic within your nested loops.
- Different Loop Types: You can mix and match loop types! You could have a for loop inside a while loop, or a do-while loop inside a for loop. The choice depends on the specific requirements of your problem.
- 2D Arrays: Nested loops are essential for working with two-dimensional arrays (matrices). The outer loop typically iterates through the rows, and the inner loop iterates through the columns, allowing you to access and manipulate each element of the array.
- Sorting Algorithms: Many sorting algorithms, like bubble sort and insertion sort, utilise nested loops to compare and rearrange elements in a list.
- Game Development: Nested loops are used extensively in game development for tasks like:
- Iterating through all the objects in a game world to check for collisions.
- Rendering graphics frame by frame.
- Processing player input.
Conclusion: Unleash Your Inner Loop Master!
Congratulations! You've taken a big step in understanding and mastering C++ nested loops. Remember to practice these concepts with different examples.
Play around with the code, modify the conditions, and see what you can create! Don't be afraid to experiment and learn from your mistakes.
Nested loops are a powerful tool in your C++ arsenal. With a good understanding of their behaviour and time complexity, you can write efficient and elegant code to solve a wide range of problems. Now go forth and conquer the world of nested loops! Happy coding!