switch Statement
Life is full of choices and so is programming. Taking your day to day decisions are completely in your hands but in C++ programming, switch statements definitely helps you to take these decisions : )
But wasn't this being already done by the if else ladder?? Yes it was, but writing an if else ladder for a large no. of options can make your code look cluttered. This is where switch statement swoops in, enabling you to make decisions in a more organised manner.
Imagine you're standing in an ice-cream shop with an empty cone, thinking about which ice cream flavour to try out today? You've got 3 buttons in front of you: pressing button 1 dispenses the chocolate cream, button 2 dispenses vanilla cream and button 3 dispenses the chocovanilla cream.
Each button serves its purpose. You pick what fits your mood best and press the required button—just like a switch statement selects the matching case according to your input and executes its code, making your day as happy as a delicious ice-cream!
Syntax
switch (variable/expression) {

    case value1:
        // body of case 1
        break;

    case value2:
        // body of case 2
        break;

    case valueN:
        // body of case N
        break;

    default:
        // body of default
}
It all begins with the switch keyword, which is followed by a variable or an expression enclosed in parentheses. The value of this variable only decides your final ice-cream, oops! I mean output.
Inside the switch statement, we encounter various cases designed to perform specific operations based on the value or expression provided. If it matches
- value1 : body of the first case is executed
- value2: body of the second case is executed
- valueN: body of the nth case is executed
Referring back to our ice-cream shop, we have 3 cases. Case 1 is the chocolate option, Case 2 is the vanilla flavour and case 3 being the chocovanilla option. Now the case matching the value of the variable/expression would be executed.
Example: When button 2 would be pressed, the input would be 2 and case matching it, i.e. case 2, its body would be executed. Here, the body of case 2 would consist of the desirable outcome whenever case 2 is executed i.e. dispension of vanilla cream.
But wait! What if the user's input is anything but not 1, 2 or 3??
Then by default, it's no ice-cream for today and try out some other snack ; )
In scenarios where no case matches the user's input, the default body is triggered.
break statement is used to break out of the switch statement once the case is executed. We'll learn about its usage in detail in the upcoming section.
'switch' function for the ice-cream example
    // button 1 -> chocolate flavour
    // button 2 -> vanilla flavour
    // button 3 -> chocovanilla flavour

    switch (button) {
        case 1:
            cout << "Dispenses chocolate cream";
            break;
        case 2:
            cout << "Dispenses vanilla cream";
            break;
        case 3:
            cout << "Dispenses chocovanilla cream";
            break;
        default:
            cout <<"Try out some other snack!";
    }
Quiz
int number = 7;

switch(number) {

    case 1:
        ...
    case 7:
        ...
    case 4:
        ...
    default:
        ...
}
Example: switch statement
Now let's solve a problem using a switch statement.
Problem Statement
You're handed a number and tasked with printing the corresponding month of the year. If the number is 1, it's January; if it's 2, it's February, and so on. Write a C++ program for the same.
Solution
#include <iostream>
using namespace std;

int main() {

    int number;
    cout << "Enter a number between 1 to 12: ";
    cin >> number;

    // corresponding case is executed depending on the value of number
    switch (number) {

        case 1:
            cout << "January";
            break;

        case 2:
            cout << "February";
            break;

        case 3:
            cout << "March";
            break;

        case 4:
            cout << "April";
            break;

        case 5:
            cout << "May";
            break;

        case 6:
            cout << "June";
            break;

        case 7:
            cout << "July";
            break;

        case 8:
            cout << "August";
            break;

        case 9:
            cout << "September";
            break;

        case 10:
            cout << "October";
            break;

        case 11:
            cout << "November";
            break;

        case 12:
            cout << "December";
            break;

        default:
            cout << "Invalid Number";
    }

    return 0;
}
Sample Outputs
Sample Output 1:
Enter a number between 1 to 12: 2
February
Sample Output 2:
Enter a number between 1 to 12: 7
July
In this program, we've employed the switch statement with twelve cases, each corresponding to a month of the year.
When a user inputs a number between 1 and 12, the program checks it against the defined cases. For instance, entering '2' matches the condition set in case 2, resulting in "February" being displayed as output.
Similarly, if the user enters '7', the program executes the instructions within case 7, printing "July".
However, if the entered number fall outside the range of 1 to 12, none of the predefined cases match the input. In such cases, the default case is triggered, and the program outputs "Invalid Number".
Sample Output 3:
Enter a number between 1 to 12: 13
Invalid Number
Problem 1
Create a program to print the vowels (A, E, I, O, U) of english alphabet.
Get an integer value between 1 to 5 and store it in a letter variable.
Use a switch case statement to print the vowel corresponding to the input.
If input is 1, print A, if input is 2, print E, and so on.
Input
5Output
USolution
#include <iostream>
using namespace std;

int main() {
    int letter;

    cout << "Enter a number between 1 to 5: ";
    cin >> letter;

    switch (letter) {
        case 1:
            cout << "A";
            break;
        case 2:
            cout << "E";
            break;
        case 3:
            cout << "I";
            break;
        case 4:
            cout << "O";
            break;
        case 5:
            cout << "U";
            break;
        default:
            cout << "Invalid input";
    }

    return 0;
}Examples of such switch statements could be:
- switch(x+y) where x and y are variables that can have any value and we would be applying switch upon the sum of them.
- switch(x/3) means that switch would be applied on the value of x/3 and not directly x.
We would see more examples and practice more problems like these in the practice module of control flow.
Why break statement in each case?
We know that, break statement is used to break out of the switch statement once the case is executed. But what does that mean or what will happen if we don't use it?
Let's see the same example:
#include <iostream>
using namespace std;

int main() {

    int number;
    cout << "Enter a number between 1 to 12: ";
    cin >> number;

    // Corresponding case is executed depending on the value of number
    switch (number) {

        case 1:
            cout << "January" <<endl;

        case 2:
            cout << "February" <<endl;

        case 3:
            cout << "March" <<endl;

        case 4:
            cout << "April" <<endl;

        case 5:
            cout << "May" <<endl;

        case 6:
            cout << "June" <<endl;

        case 7:
            cout << "July" <<endl;

        case 8:
            cout << "August" <<endl;

        case 9:
            cout << "September" <<endl;

        case 10:
            cout << "October" <<endl;

        case 11:
            cout << "November" <<endl;

        case 12:
            cout << "December" <<endl;

        default:
            cout << "Invalid Number" ;
    }

    return 0;
}
After removing all the break statements, we'll recieve the following output after running the code:
Enter a number between 1 to 12: 9
September
October
November
December
Invalid Number
In the above example where the user inputs '9', the case that matches '9' corresponds to September, as expected.
However, the subsequent cases after the matching case (September) are also executed without the break statement. Therefore, in this scenario, the program displays the outputs for October, November, December, and the default (Invalid Number) cases.
This unintended behavior arises due to the absence of break statements within each case. Hence, it's important to add break statements in each case.
'switch' statement with multiple cases
In our previous lesson, we discovered that without including a break statement after each case, all subsequent cases are executed. However, in certain scenarios, we might want to execute multiple cases together, allowing us to omit the break statement.
Let's see an example for the same. We'll classify months into those with 31 days, 30 days, and a special case of February having 28 days in non- leap year and 29 days in a leap year:
#include <iostream>
using namespace std;

int main() {
    int month;
    cout << "Enter a number between 1 to 12: ";
    cin >> month;

    switch (month) {
        // Months with 31 days
        case 1:
        case 3:
        case 5:
        case 7:
        case 8:
        case 10:
        case 12:
            cout << "This month has 31 days.";
            break;

        // Months with 30 days
        case 4:
        case 6:
        case 9:
        case 11:
            cout << "This month has 30 days.";
            break;

        // February
        case 2:
              cout << "This month has 28 days in a non-leap year and 29 days in a
              leap year.";
            break;

        default:
            cout << "Invalid number";
    }

    return 0;
}
Sample output 1:
Enter a number between 1 to 12: 5
This month has 31 days.
Sample output 2:
Enter a number between 1 to 12: 11
This month has 30 days.
Here, months like January, March, May, July, August, October, and December (cases 1, 3, 5, 7, 8, 10, and 12) have 31 days. Therefore, we use a single print statement and a break for each of these cases.
On the other hand, months such as April, June, September, and November (cases 4, 6, 9, and 11) have 30 days. Hence, a single print statement and a break are used for each of these cases to signify the number of days.
Finally, February (case 2) is considered separately due to its variability in days, and we use a distinct print statement along with a break to address this case.
Problem 2
Create a program to determine prime and composite numbers within the range of 1 to 15.
Prompt the user to input an integer between 1 and 15 and store it in a variable.
Use a switch statement to distinguish between prime and composite numbers.
For cases outside the range of 1 to 15, display "Invalid Number."
Hint
Employ cases for individual numbers to identify Prime Numbers (2, 3, 5, 7, 11, 13) and Composite Numbers (4, 6, 8, 9, 10, 12, 14, 15). 1 would be a special case as it's neither prime nor composite.
Input
7Output
Prime NumberSolution
#include <iostream>
using namespace std;
int main() {
int number;
cout << "Enter a number between 1 and 15: ";
cin >> number;
switch(number) {
case 1:
cout << "Neither Prime nor Composite";
break;
case 2:
case 3:
case 5:
case 7:
case 11:
case 13:
cout << "Prime Number";
break;
case 4:
case 6:
case 8:
case 9:
case 10:
case 12:
case 14:
case 15:
cout << "Composite Number";
break;
default:
cout << "Invalid Number";
break;
}
return 0;
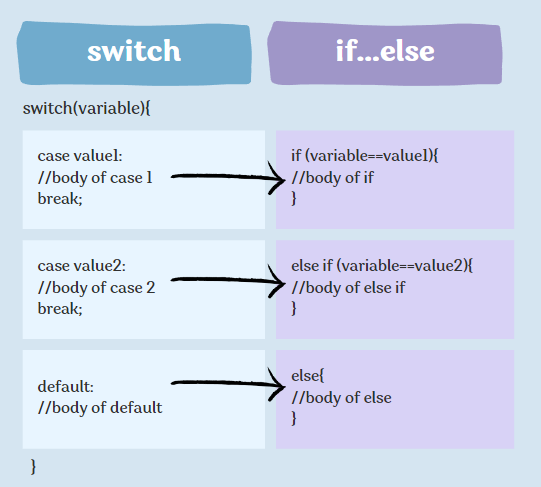
}switch & if...else ladder
If the switch statement still feels confusing, imagine it as an actual substitution for the if...else laddder. Let's illustrate this with a simple example.
Suppose we have a switch statement containing two cases, depicted like this:
switch(variable) {

    case value1:
        // body of case1
        break;

    case value2:
        // body of case2
        break;

    default:
        // body of default
}
Then, its if...else ladder equivalent would be:
if (variable == value1) {
    // body of if
}
else if (variable == value2) {
    // body of else if
}
else {
    // body of else
}
With this we come to an end of this article. I hope you were able to understand the concepts of switch statement. If not, then try to go through the article once again and don't forget to solve the questions on your own as well : )
Once you feel confident enough with it, then feel free to move to the practice problems where we would be covering way more complex and variety of problems of switch statement.